Send Web Request
"Send Web Request" is a powerful automation action, enabling users to push data to third-party platforms by constructing web requests. This not only enhances system interoperability but also significantly expands the possibilities for data processing and integration.
This "action" supports various web request methods, including GET, POST, PATCH, and DELETE. You can select the appropriate method to access third-party APIs for reading, updating, adding, or deleting data based on your needs.
Getting Started: How to Configure Your Web Request
Diving into "Send Web Request" begins with setting up a few essential parameters that outline your request. Below is a breakdown of the configuration options available through the interface, complete with descriptions to guide you:
HTTP Request Methods: Select the HTTP method that aligns with the action you intend to perform via the external API. The methods include:
- GET: Ideal for retrieving data.
- POST: Best suited for submitting new data entries.
- PATCH: Used for making partial updates to existing data.
- DELETE: Employed to remove data from the system.
Request URL: Input the API endpoint URL to which the request will be sent. This URL typically begins with "https://" or "http://".
HTTP Headers: (Optional) Here, you can define any necessary headers for your request. Headers are crucial for conveying authentication details, specifying the content type of the request, among other uses. For example, if the API demands authentication, you might need to include a header named Authorization with the value set to
Bearer <token>, where<token>is your authentication token from the third-party service. For more on authentication, especially using a Bearer Token with AITable's API, refer to the developer documentation.
- HTTP Body: (Optional) This section is relevant for methods like POST and PATCH, where you can send data within the request body.
- For GET requests, leave the body section empty.
- The body can be in
json,form-data, orrawformat, affecting whether you need to include aContent-Typeheader and how you structure the data in the body.- json: A widely used data format on the web, presented in key-value pairs.
- form-data: Another format, typically used for data submission from web forms. While not elaborated here, those interested can look up "form data" online.
- raw: Choose this if the third-party service's API necessitates a unique data format.
Examples
The "Send Web Request" action empowers AITable to interface with APIs from third-party platforms, streamlining the data exchange process between different systems. This section offers two practical examples to illustrate how "Send Web Request" can be applied effectively.
1. Streamlining Order Creation with a Button Column
Consider a scenario in customer management and order tracking, where we have two pre-established AITable datasheets:
- Sheet A: Manages customer information.
- Sheet B: Tracks customer orders.
Through automation, we can:
- Automatically generate a new order record in the order tracking sheet linked to the respective customer upon the addition of a new customer to the customer management sheet.
- Enable sales staff to effortlessly create a new order for existing customers by clicking a "Create Order" button in the customer management sheet, which then adds a new order record for that customer in the order tracking sheet.
The process is visualized in the diagram below:

After configuring the sheets and automation task as described, the result looks like this:
In the demonstration, three sample customers are pre-defined: "Kaletoys", "Rainbow Playground", and "Joyful Creations".
When the sales team clicks the "Create New Order" button for a customer, the system initiates the "Create Order Automatically" automation task. This action automatically generates an order record in the "Orders" datasheet for the selected customer, assigning an order number that combines the Date and an Autonumber. This setup achieves a Two-way Link between the customer and their order.
This example aims to elucidate the "Send Web Request" functionality. For more information on Buttons and Automation, please explore those topics independently.
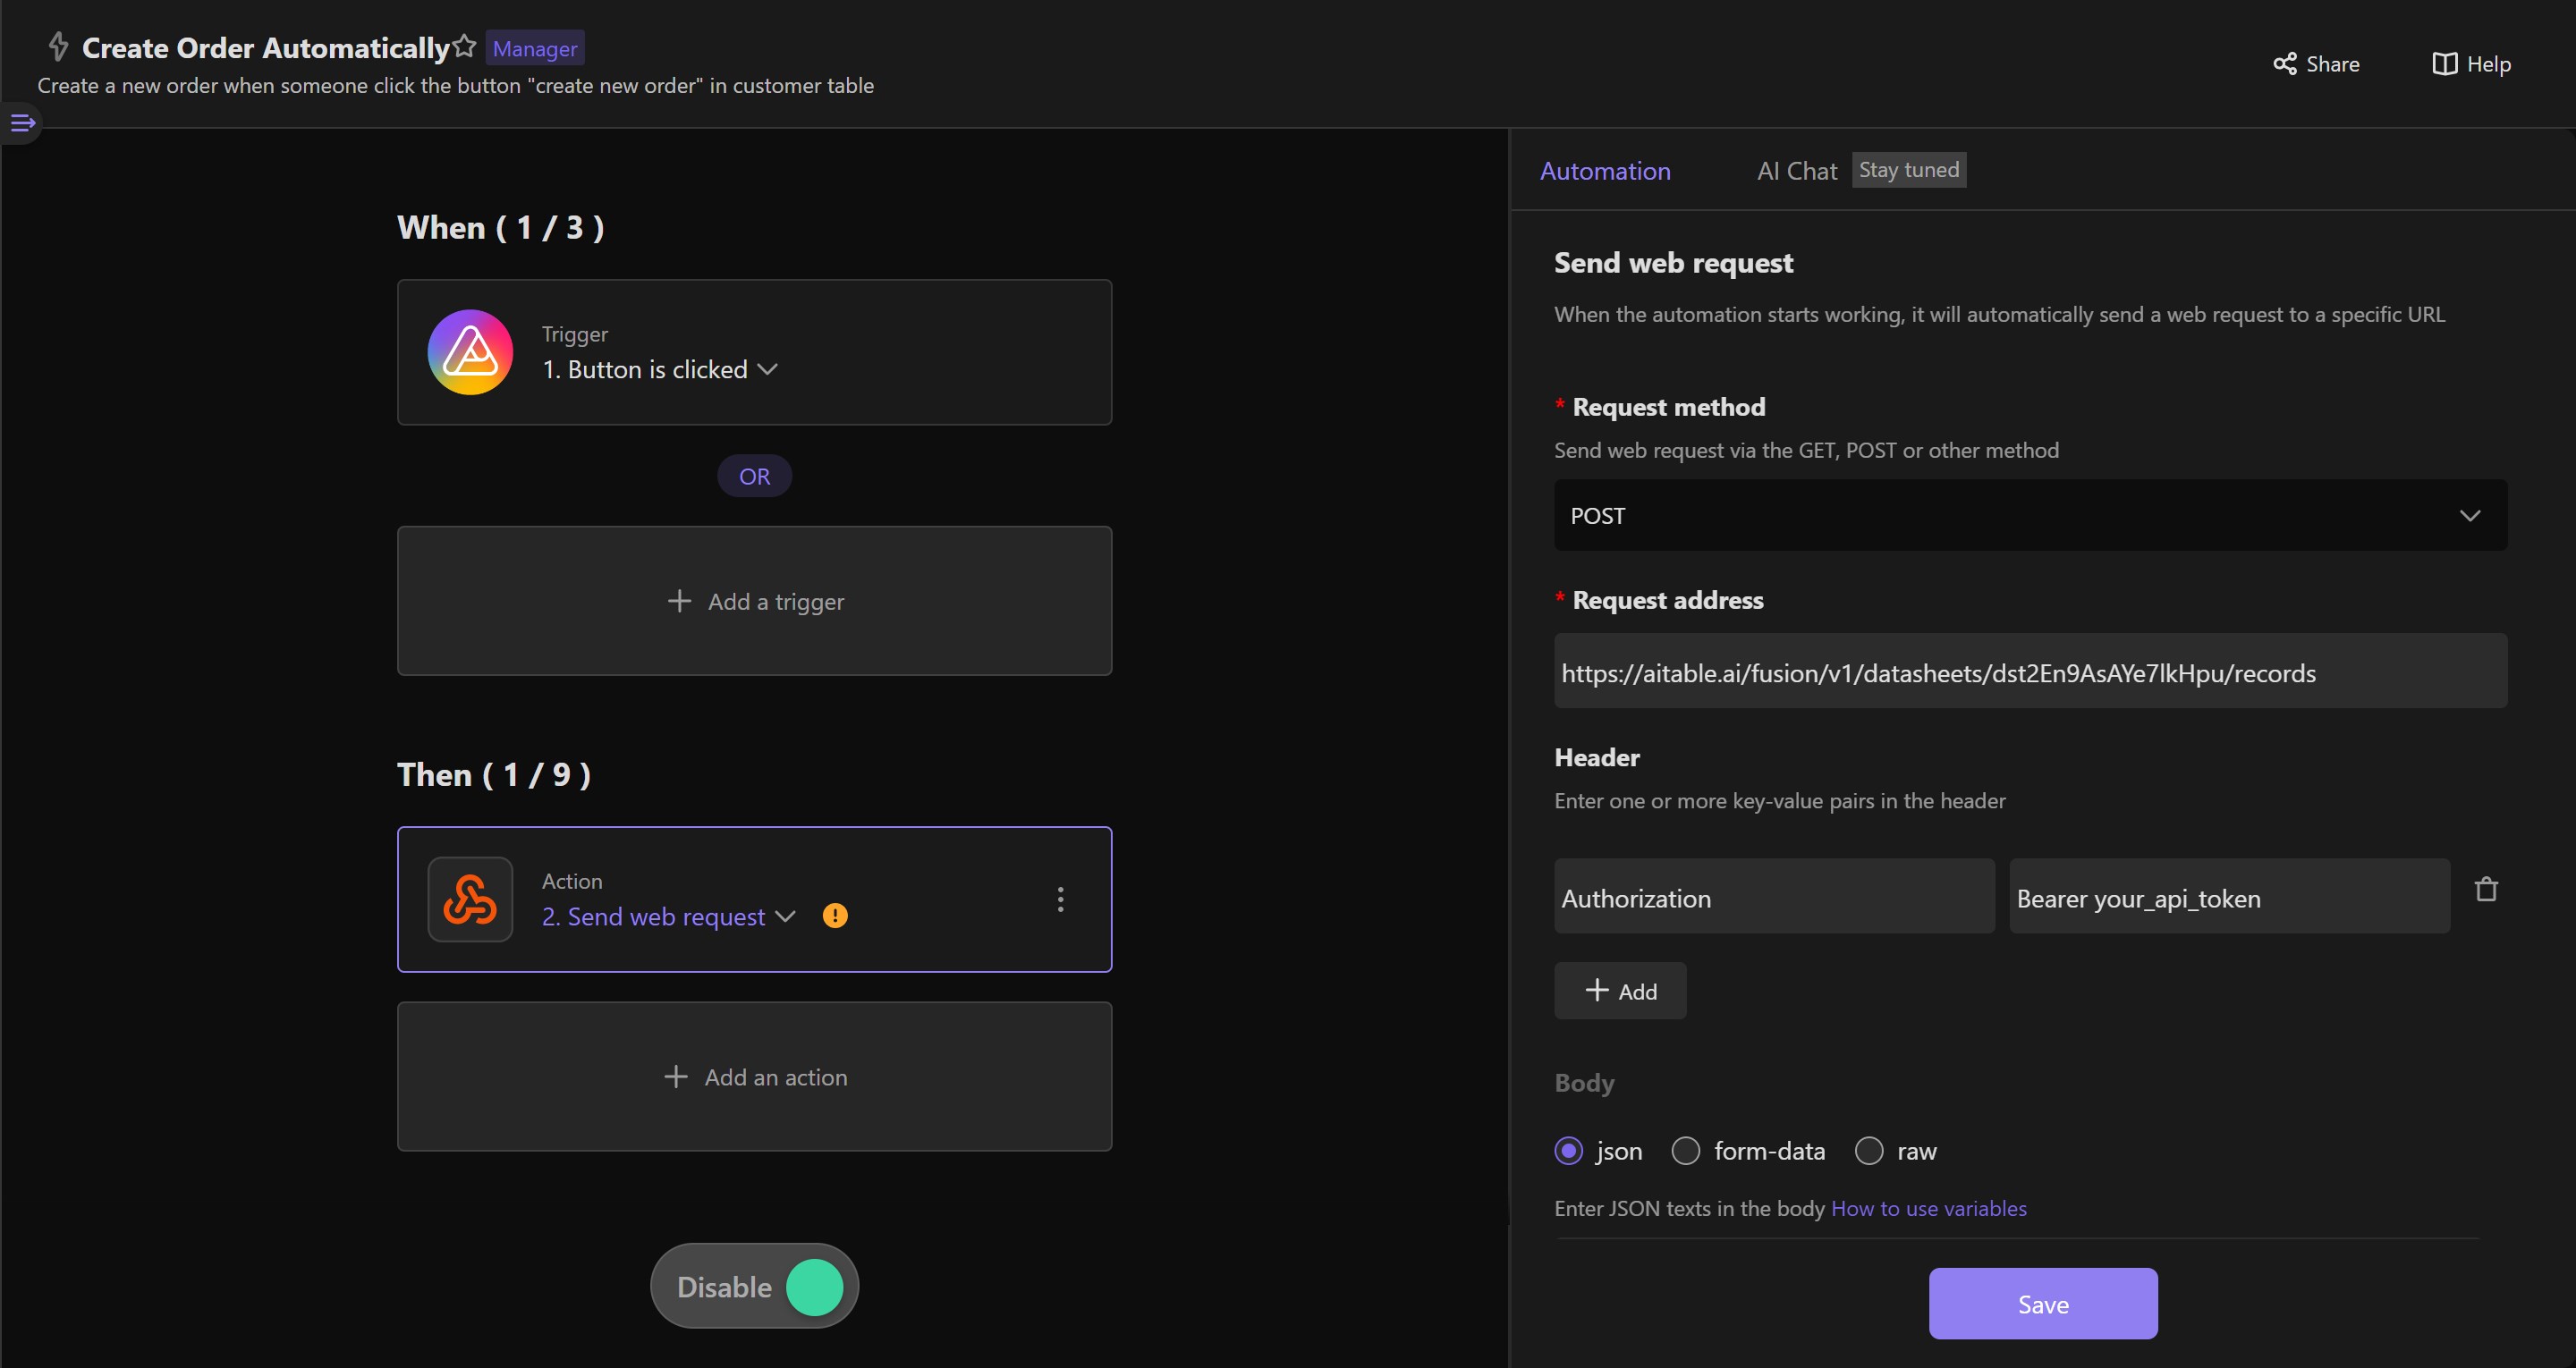
Below is the detailed configuration needed for the "Create Order Automatically" automation task:
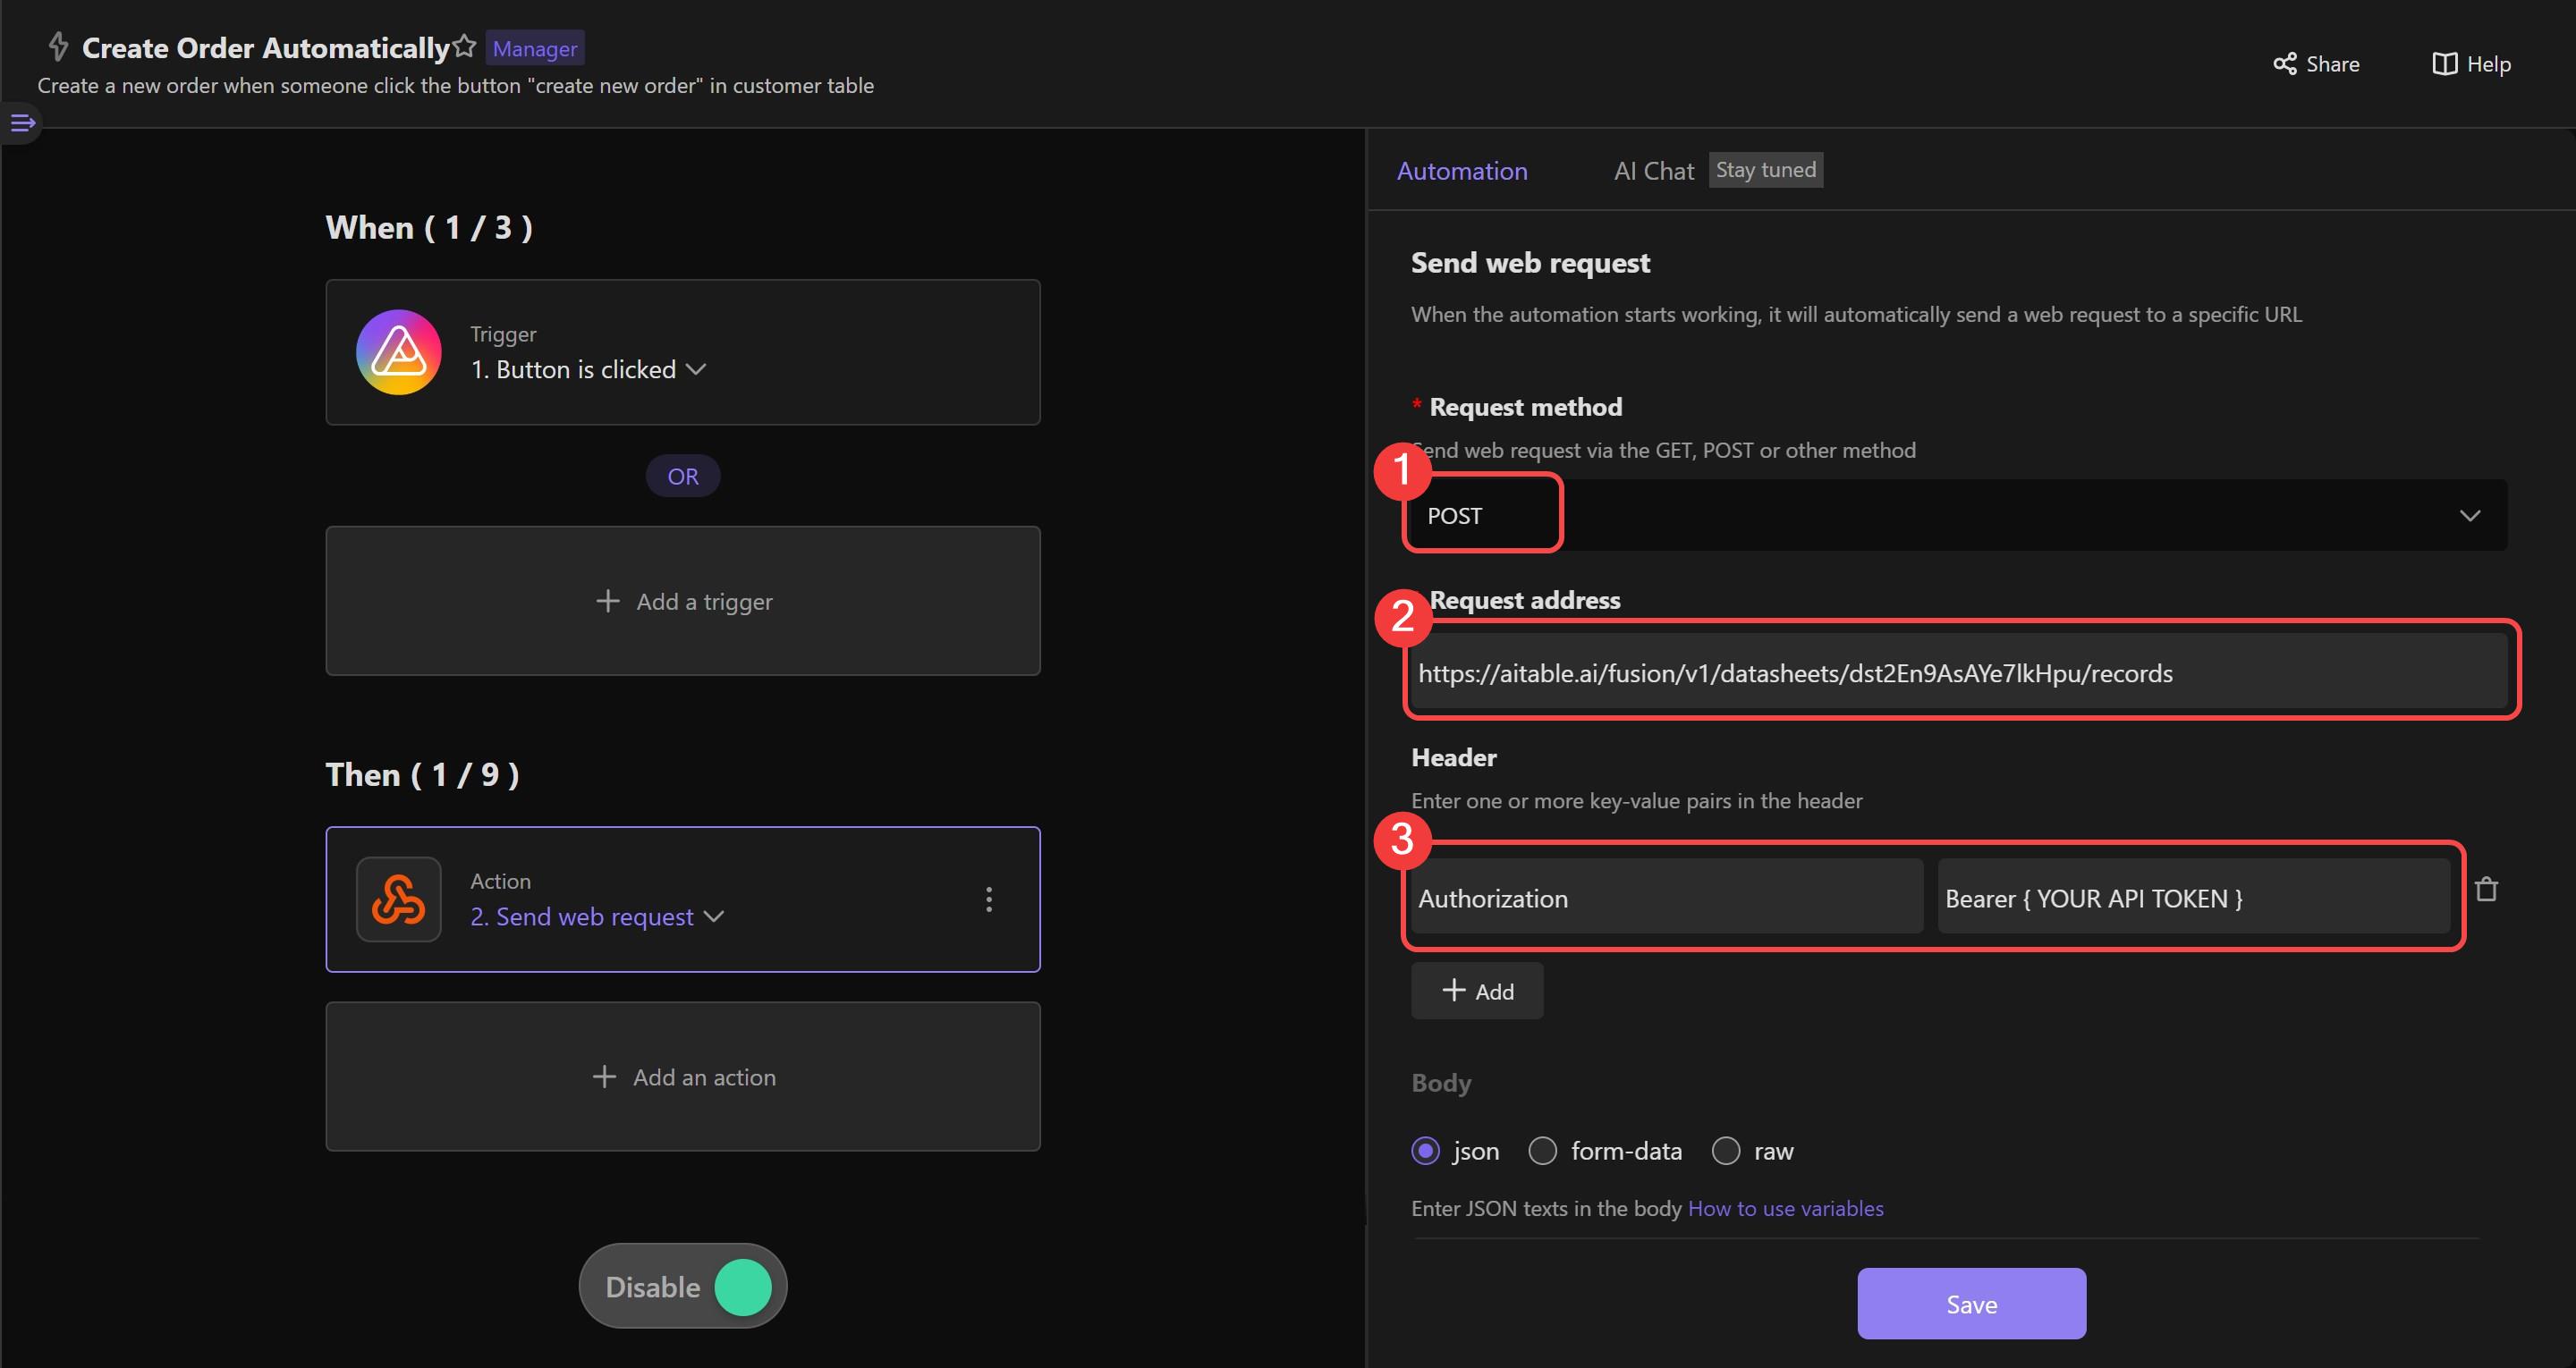
To grasp the details presented in the screenshot, familiarity with AITable's API is required. Here, we utilize the "Create Records" API.
① Choose POST as the "Request Method" to indicate that the operation aims to create new records.
② For "Request address", use the API request URL for Creating Records, incorporating the datasheetId of the "Orders" dataseet (Understanding datasheetId).
③ In "HTTP Headers", add your authentication details, setting the key as
Authorizationand the value asBearer {your personal API token}(note the space after "Bearer"). For guidance on obtaining your API Token, click here.④ For the "Body", select the
jsonformat. The body content should follow the specifications of AITable's "Create Records" API JSON data structure, as detailed in the developer documentation.
For clarity, the request body content in this explanation is simplified to include just one record in the "Orders", linking the customer's recordId from the "Customer Management" datasheet in the "Customer" field.
This configuration enables sales staff to create an order and establish a two-way link between the customer and their order by clicking the "Create New Order" button.
It's important to ensure that the fields in the request body match the datasheet. In this case, the field is Customer, and the complete JSON request body is:
{
  "records": [
    {
      "fields": {
        "Customer": "{insert variable here}",
      }
    }
  ],
  "fieldKey": "name"
}
2. Pushing Data to Thousands of Platforms through Third-party Connectors

In the first example, we explored how "Send Web Request" facilitates internal data flows within AITable, such as updating one sheet based on changes in another. The second example expands on this by demonstrating how to utilize "Send Web Request" to transmit data from an AITable sheet to a third-party connector platform. This enables integration with an extensive array of platforms through the connector's rich application ecosystem.
Here's how AITable data can be received using the Webhook functionality of a connector platform:
Platforms like Zapier, Activepieces, and Make.com support Webhooks, allowing them to accept data from external sources. In this scenario, AITable datasheet send customer information to the connector platform via Webhooks. The synergy between AITable's "Send Web Request" and the Webhook feature of third-party connectors opens up numerous practical applications, such as:
CRM Synchronization: Effortlessly synchronize sales and customer service data from AITable with third-party CRM systems like Salesforce or HubSpot. This synchronization ensures that sales teams have immediate access to the latest customer interactions and sales leads.
E-commerce Order Management: Directly transfer new order details from AITable to e-commerce platforms such as Shopify or Magento. This integration facilitates automated order processing and real-time inventory management.
Financial Software Connectivity: Streamline accounting by sending AITable financial records (invoices, expense reports, etc.) to financial management software, automating account updates.
Project Management Collaboration: Seamlessly push tasks and project updates from AITable to project management tools like Trello or Asana, enhancing cross-platform collaboration and real-time progress tracking.
Marketing Automation Engagement: Leverage AITable data to trigger personalized marketing campaigns and email sequences on platforms like Mailchimp or Marketo, based on customer interactions and data.
Social Media Content Distribution: Automate the publication and management of marketing content on social media through integration between AITable and social media tools like Hootsuite or Buffer.
(These scenarios are illustrative and intended to spark ideas; actual implementation may require further customization and optimization.)
Q & A
Why might "Send Web Request" fail?
- Verify Request Details: Double-check the request method, URL, headers, and body for accuracy. Tools like Postman can help simulate and validate your requests.
- Review the Response: Look for error messages in the run history. Errors are usually recorded in the run history, offering clues for troubleshooting. For detailed guidance, visit: https://help.aitable.ai/docs/guide/manual-automation-robot#how-to-troubleshoot.
How does Content-Type vary with the request body?
- JSON: Use application/json for JSON objects (the system may autofill this).
- Form-Data: Use application/x-www-form-urlencoded for straightforward key-value pairs.
- Raw: For unformatted text, use text/plain. Ensure the receiving API can interpret the text format you're using. The Content-Type in your headers must correspond to the format of your request body.
Helpful Resources and Glossary
For those new to programming or seeking further clarification, below are links to third-party resources and a glossary to demystify technical jargon: